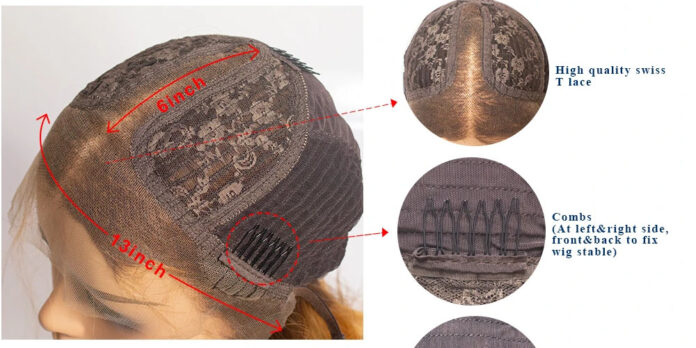
There are different types of lace wigs, one of them being the T part lace wig. These wigs have a ‘T’ shaped lace that is 13 inches long, from one ear to the other, and 6 inches deep from front to the tip of the T. A T part lace wig resembles a lace frontal but has a small-sized lace which makes it hard to work with. In this extract, we discuss ways of making a natural-looking T part wig.
Ways of Making Your T Part Wig Look Natural
You need to be extra careful when installing a T part wig compared to other wig forms due to the less lace. Making it look natural isn’t as easy, especially for beginners. Below are the steps taken to make it as natural-looking as possible.
1. Wear your wig
Before wearing the wig, part your natural hair in the middle. Ensure the part is clear, comb your hair and hold it at the back. Put on the wig; make sure the T part matches your parting. Secure the wig using the combs on its sides and that on the nape to prevent it from slipping off when cutting the lace.
2. Trim the excess lace
Carefully cut off the lace sitting on your forehead. Use your hairline as your guide and ensure you don’t cut any lace behind it. Proper trimming of the lace helps mimic the hairline and gives the illusion of hair growing from your scalp.
3. Apply your preferred wig glue
Wig glue comes in handy while using lace wigs. It keeps them flat and in place hence more natural. You can decide to apply the glue and tint the top of the lace later or first tint beneath the lace, then glue the wig. Use a foundation that matches your scalp color such that it blends well, and noticing it becomes a challenge.
4. Prepare the hairline
Hairline preparation means plucking the hair to form baby hairs. Some wigs are sold pre-plucked, so this step is not necessary. If not plucked, do it carefully to distinguish between the remaining hairline and the baby hair. Separate a few strands of hair across the hairline and cut them using scissors or a razor until they seem realistic.
5. Lay the cut baby hairs
You should note that making baby hairs is optional. However, if you want to make your wig look more natural, it’s essential to have them. Use gel and a brush or small toothed comb to style the hairs.
6. Pour powder on the wig
Put little powder on the boundary between the baby hairs and the actual hairline. This practice makes that part of the lace look like your scalp.
7. Flatten the hairline and parting
You can use gel again or a hot comb to make everything look like its origin is the scalp. It also makes the wig seamless, creating that natural look on a T part lace wig.
Conclusion
Customizing a T part lace wig is challenging, so be careful when wearing it due to the minimal lace. The steps above are straightforward and ideal for anyone looking to buy this kind of wig. When properly installed, the lace wig is beautiful, with a natural appearance, and you can proceed to style as desired.


